Design for Manufacturing and Metalworking
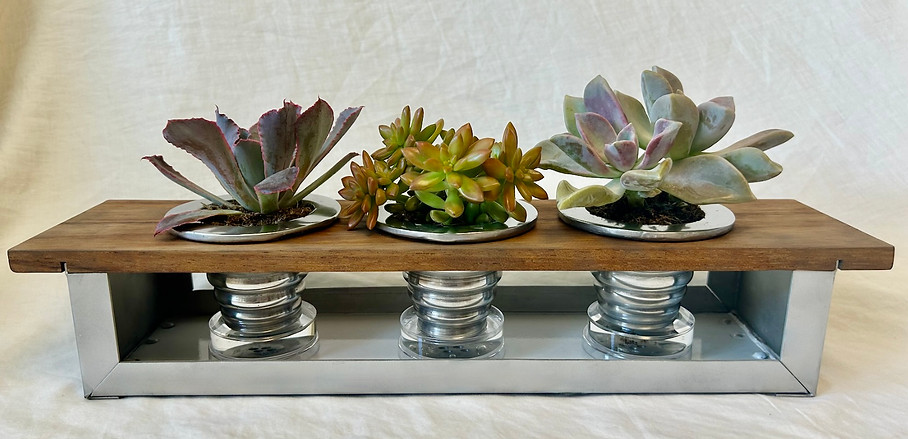
Antigravity Plant Stand
A bottom-watering planter system fabricated using aluminum casting, sheet metal forming, TIG welding, woodworking, and turning on the lathe.
Objective
Outcome
Gain familiarity with product realization and metalworking by making anything you want! At least two manufacturing processes must be used to create the final product.
A functional and aesthetically pleasing planter system that would allow my succulents to absorb water from the bottom, reducing the risk of overwatering.
The Process


Step 1: Prototyping
I started by prototyping the design using cardboard and paper cups, because I wanted to make sure the interface between the support structure and top piece allowed the top piece to be easily taken on and off for cleaning.
I also prototyped the corner joint, which I made through sheet metal bending and TIG welding, to make sure that I could achieve a water tight joint for the base.

Step 2: Pattern Making
After designing the pattern on Fusion 360, I made the pattern board using a variety process, including 3D printing, woodworking, wax filleting, and sanding.
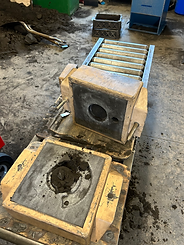
Step 3: Sand Casting
It ended up being very difficult to get the sand to pull out of a cup that deep, resulting in lots of iterations in the pattern to increase draft and improve the design for casting. In the end, I used a loose pattern instead, which reduced the depth of the cavity that the sand needed to pull from, and I added an airflow tunnel to the base of the cup to help the molten metal more easily flow against gravity. After eleven failed ramp ups, lots of support from mentors and teachers, and one backup project, I was able to successfully cast a cup, and it was the best feeling ever.


Step 4: Turning Grooves on the Lathe
I wanted to make grooves in the cups that looked bubbly and organic, which was not achievable through casting, and so I turned these grooves on the lathe after casting. To do this, I cut out large grooves with small step downs and step overs, and then smoothed down these small step overs using a file.
Step 5: Sheet Metal Forming
I made the sheet metal base with three pieces of sheet metal that I bent using the finger brake and then riveted together. I powder coated the bottom of the base with white to lighten the design and add contrast to the top wood piece.


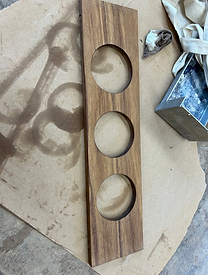
Step 6: Forming Wood Top Piece
I used a table saw to cut slots in the wood so it could rest on top of the sheet metal base and I used a hole saw to cut out three holes in the wood to support the cups. I then stained the wood to the desired finish, using an oil to highlight the natural grain of the wood.


Step 7: Add Plants, Add Water,
and Enjoy!
Skills Learned
-
The power of prototyping
-
How to fail well
-
Introduction to design for manufacturing processes